

How to Tie Down a Motorcycle for Transport
 Neighbors Trailer
Jul 30, 2026 85 15 min read
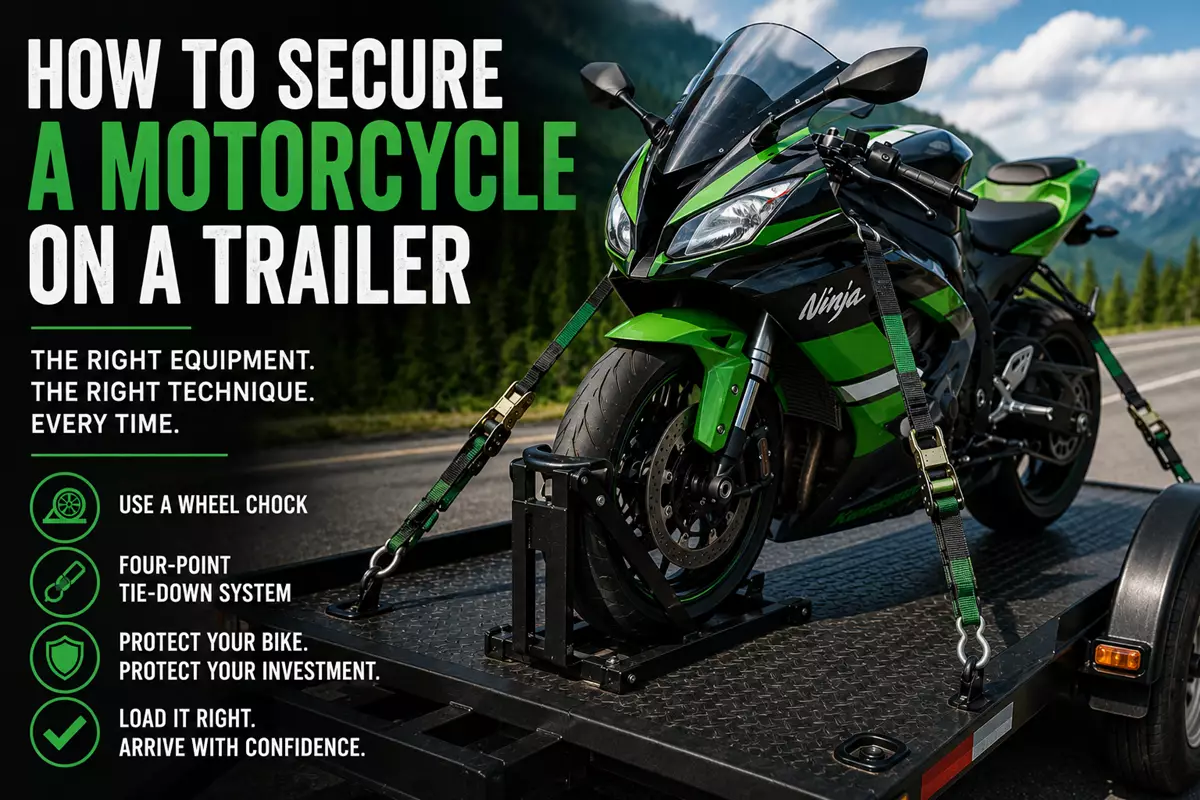
Transporting a motorcycle on a trailer is one of the highest-stakes cargo scenarios in trailer rentals. Motorcycles are top-heavy, expensive, and unforgiving of poor loading technique. A bike that falls over on the trailer at highway speed rarely arrives at its destination in the same condition it started. A bike that stays upright but rocks against its straps for hundreds of miles arrives with damaged forks, seals, or fairings. The difference between a successful transport and a costly one is a repeatable set of techniques: the right wheel chock, the right anchor points on the bike, and a four-point strap pattern that compresses the front suspension just enough to hold the bike stable without damaging it. This guide walks through exactly how to do it, what equipment you need, and the common mistakes that turn valuable bikes into insurance claims.
Why Proper Securing Matters More Than It Feels Like
Most other cargo is forgiving to imperfect loading. A refrigerator strapped slightly loose might scuff the trailer wall; a box of tools might rattle around; a pallet of bricks stays put by sheer weight. Motorcycles are none of those things. They are tall, narrow, top-heavy, and rest on two contact patches that provide almost no lateral stability. The moment strap tension drops or the bike shifts against its chock, physics takes over.
The Failure Modes
Three specific failure modes account for almost all motorcycle transport damage. The first is the bike tipping over in the trailer, which happens when strap tension is inadequate or a strap breaks. The second is the bike rocking against tight straps for hundreds of miles, which slowly damages fork seals and suspension components without producing visible failure. The third is the bike sliding forward or backward during braking or acceleration, which happens when the wheel chock is not properly anchored to the trailer deck. All three are entirely preventable with the practices below.
The Cost Math
A dropped or damaged bike is often a total loss on the transport itself, before considering the underlying value of the motorcycle. Fork seals cost hundreds of dollars to replace and are a common consequence of over-compression during transport. Fairing damage can run into the thousands on modern sport bikes. A cracked frame can total a bike outright. Compared to those numbers, the cost of doing tie-downs correctly (about twenty minutes of careful work with the right equipment) is trivial.
What You Need Before Loading
Every motorcycle transport needs the same basic equipment. Assemble it before the bike is anywhere near the trailer, because scrambling to find a strap while a bike is balanced on a ramp is exactly how bikes get dropped.
The Wheel Chock (Not Optional)
A wheel chock is a fitted cradle that holds the front tire upright and prevents it from rolling forward or backward. This is not optional equipment. Every motorcycle transport starts with the front wheel captured in a chock that is bolted to the trailer deck. Adjustable chocks accommodate different tire widths; fixed chocks are sized for specific tire ranges. Confirm the chock fits your bike's front tire before you start loading. A chock that is too wide lets the tire rock; too narrow will not fully seat.
Ratchet Straps (Not Bungees, Not Rope)
Four to six ratchet straps rated for at least 1,500 pounds working load are the right tool. Two-inch wide straps with S-hooks or J-hooks that can attach to the trailer's anchor points. Bungee cords cannot generate enough tension to hold a motorcycle stable and will fail on the first hard bump. Rope stretches, loses tension, and slips through knots at highway speed. Neither is an acceptable substitute for real ratchet straps.
Soft Loops and Handlebar Straps
Soft loops are short nylon straps designed to wrap around bike components that would otherwise be damaged by ratchet hook contact. A soft loop wraps around a triple tree or sub-frame, and the ratchet strap hooks onto the soft loop rather than directly onto the bike. Handlebar tie-down straps are a specific variant designed to distribute tension across the handlebar assembly without concentrating force on one point. Both are inexpensive (around $10-20 each) and prevent the finish damage that hooks would cause on bare metal or paint.
Padding and Optional Extras
Moving blankets or foam padding are useful for any point where straps might rub against painted or plastic surfaces. A fork saver is a plastic or metal spacer that fits between the front fender and the fork tube to prevent over-compression during strapping. A brake lever tie is a small strap or velcro band that holds the front brake engaged during transport as an additional safety measure.
Choosing the Right Trailer for Motorcycle Transport
The trailer choice matters as much as the strapping technique. Not every trailer is well-suited to a motorcycle.
Open Utility Trailer
The most affordable option and appropriate for dry-weather trips or bikes that are already weathered. A utility trailer with a wheel chock and proper anchor points works well for short trips or bikes not worth the enclosed premium. The tradeoff is complete exposure to road grime, rain, and highway wind pressure. On a 500-mile trip in variable weather, an open trailer subjects the bike to more environmental stress than most owners want.
Enclosed Cargo Trailer
The right choice for any motorcycle worth more than a few thousand dollars. Enclosed trailers eliminate weather exposure, reduce wind buffeting that stresses tie-downs, and provide interior walls that can serve as backup bracing. For long-distance transport or valuable bikes, the enclosed premium pays for itself many times over.
Motorcycle-Specific Trailers
Some rental trailers are specifically designed for motorcycle transport, with integrated wheel chocks, tie-down points positioned for bike geometry, and interior dimensions optimized for one or more bikes. If a host lists a motorcycle-specific trailer, it is usually worth the small premium over an equivalent-sized cargo trailer. Our trailer sizing guide covers the size decisions that apply to motorcycle transport specifically, including when to upsize for multiple bikes. For a fast size match by bike count and type (or if you're hauling an ATV or UTV alongside), the ATV/UTV/Motorcycle calculator returns a recommendation in seconds.
The Wheel Chock Setup
The chock is the primary stability point for the entire transport. If the chock fails or the bike slides out of it, no amount of strapping will hold the bike stable.
Bolt It to the Trailer Deck
The chock must be physically anchored to the trailer deck, not just placed on it. Most trailers with anchor points allow the chock to be bolted or clamped into position. If the trailer has track-mounted anchoring, use the trailer's designed attachment. If you must use a chock that sits on top of the deck, weigh it down or strap it to the deck before loading the bike. A chock that slides during braking or acceleration is worse than no chock at all.
Position for Weight Distribution
Position the chock so that the loaded bike sits forward of the trailer's axle, following the 60/40 loading rule. For a single motorcycle on a small trailer, this usually means the chock is roughly one-third of the way back from the front of the trailer. Consult the loading distribution principles in our trailer loading guide for the full weight-distribution reasoning.
Adjust for Your Specific Tire
Adjustable chocks have wing bolts or clamps that widen or narrow the tire cradle. Set the width so the bike's front tire seats deeply into the chock with light friction on both sides. A tire that only touches at the top of the cradle allows the bike to rock; a tire that has to be forced in stresses the sidewall unnecessarily.
Loading the Bike Onto the Trailer
The loading process is where most bikes get dropped, usually because the rider or pusher tried to shortcut a step.
Ride On or Push On?
For experienced riders on familiar bikes with wide ramps, riding the bike onto the trailer at low speed is efficient and controlled. For anyone less confident, pushing the bike up with a helper on each side is safer. There is no shame in pushing; there is significant shame in dropping a bike off a ramp. If you push, keep the bike straight, use first gear, and have the helper walk beside rather than behind (a bike falling backward crushes anything behind it).
Ramp Setup
The ramp must be securely attached to the trailer with the manufacturer-designed pins or hooks. A ramp that shifts under weight during loading is a serious hazard. Verify the ramp is rated for the bike's weight plus the rider or pusher's weight (a 400-pound bike plus a 200-pound rider is 600 pounds on a ramp that many aluminum motorcycle ramps are rated for). Ramp width matters: narrower ramps make riding on genuinely difficult and increase the risk of the bike leaning off the edge.
Rolling Into the Chock
Once on the trailer, roll the bike forward until the front tire seats fully into the chock. The chock should grip the tire, and the bike should feel more stable than it did on the ramp. Only then release the throttle or handlebars to switch to strapping.
The Four-Point Strap Pattern
Two straps on the front, two on the rear. Each pair pulls the bike downward and inward, compressing the suspension slightly and eliminating side-to-side movement.
The Bike's Real Anchor Points
Motorcycles have specific structural points that were designed to handle load. These are the only acceptable strap anchors. On the front, the triple tree (the assembly at the top of the front forks where the handlebars attach) or the frame at the steering head. On the rear, the sub-frame (the structural extension behind the seat) or specific tie-down loops on some bikes. Use a soft loop around the anchor point, then hook the ratchet strap onto the soft loop.
Front Straps
Two straps run from the triple tree area down and outward to anchor points on the trailer deck. The angle should be roughly 45 degrees off vertical, pulling the bike down and slightly forward toward the chock. Tension until the front suspension compresses about one to two inches (measured at the fork sliders). This preloads the suspension so it cannot cycle during transport.
Rear Straps
Two straps run from sub-frame anchor points down and outward to trailer anchor points behind the bike. These keep the bike from lifting off the chock and prevent backward movement during braking. Tension until snug; the rear does not need the same preload compression as the front.
Cross-Tension for Stability
Each strap opposes another. A front-left strap pulls the top of the bike to the left; a front-right strap opposes it. The two together lock the top of the bike laterally. Same on the rear. Never rely on straps that pull from only one side or one direction.
What NOT to Strap To
Several parts of a motorcycle look like reasonable anchor points but will damage the bike or fail entirely under load.
Handlebars Alone
Handlebars themselves are not structural in the sense straps require. Straps pulling on bare handlebars compress the handlebar assembly against the triple tree in ways that can damage the handlebar controls, bend the bars, or twist the bar clamps. If you must anchor to the front, use the triple tree with soft loops. Handlebar-specific tie-down straps (designed to distribute across the assembly) are acceptable when used correctly.
Mirrors, Turn Signals, or Plastic Parts
Anything plastic or bolt-on will break under strap tension. Mirrors snap off. Turn signal stalks crack. Fairings crush. Restrict all anchor points to structural metal components.
Suspension Components
Fork tubes, rear shocks, and swing arms are moving suspension parts. Strapping to them either damages the component or prevents it from operating correctly. Anchor to the frame above and around the suspension, never directly to it.
The Brake Lever Backup
Even with perfect strapping, a small extra measure of security is worth taking.
Why It Matters
If a strap loosens during transport (rare with proper ratchets, but possible with cheaper straps or extreme conditions), the bike can shift enough to loosen the wheel chock. If the front wheel can rotate freely, the bike can then roll forward or backward inside the trailer. A brake lever tie prevents the front wheel from turning even if the bike shifts.
How to Rig It
Pull the front brake lever fully to the grip and hold it there with a purpose-made brake lever strap, a velcro band, or in a pinch, a zip tie. The tie should be tight enough to keep the brake fully engaged but loose enough to remove without cutting delicate components. Remove it before starting the bike at the destination (obviously). Never leave a brake lever engaged for more than a few days, since sustained pressure can damage master cylinder seals on some bikes.
Common Motorcycle Tie-Down Mistakes
Certain mistakes appear repeatedly and are worth flagging by name. Each is preventable with a specific alternative.
| Mistake | What It Damages | What to Do Instead |
|---|---|---|
| Using bungee cords or rope instead of ratchet straps | Bungees fail immediately under real load; rope loosens over time | Rated ratchet straps (1,500+ lbs working load), four minimum |
| Strapping to bare handlebars | Bends bars, twists clamps, damages hand controls | Use triple tree with soft loops, or purpose-made handlebar straps |
| Over-compressing the front forks | Damages fork seals; bike arrives with leaking forks | Compress 1-2 inches at fork sliders; use a fork saver spacer if unsure |
| Not compressing at all | Bike lifts off chock on bumps; straps can go slack mid-trip | Apply enough tension to visibly compress the front suspension slightly |
| Skipping the wheel chock | No primary stability point; straps alone cannot hold bike upright | Always use a wheel chock, bolted to the trailer deck |
| Only using front straps | Bike can lift and rock backward; can slide during braking | Four straps minimum, two front and two rear |
| Strapping to mirrors, turn signals, or plastics | Component breaks under load; strap comes free mid-trip | Restrict all anchors to structural metal components only |
| Not padding under straps on painted surfaces | Strap wears through paint or clear coat | Use soft loops or padding at any strap-to-paint contact point |
| Skipping the brake lever backup | If a strap loosens, no secondary containment for the front wheel | Rig a brake lever tie as a backup; remove before starting |
The Fuel-Stop Walkaround
Even a properly-strapped bike deserves a quick check at every fuel or rest stop. Straps can loosen from vibration, chocks can shift, and small movements that would not be noticeable at speed become visible when the trailer is stationary.
What to Check
Walk around the trailer with the bike still strapped. Push on the front and rear of the bike with moderate force. If the bike moves more than a fraction of an inch in any direction, tighten the appropriate straps. Look at each strap for signs of wear, twist, or slippage. Verify the ratchet mechanisms are still fully engaged. Check that the wheel chock is still fully seating the tire.
Signs Something Has Shifted
Uneven strap tension (one strap noticeably tighter than its opposite), visible chock movement on the deck, dust or debris trails suggesting the bike has shifted, or a bike that leans slightly to one side that was upright at loading. All of these are reasons to re-tension before continuing.
Unloading Safely
Unloading is the last stage where a bike gets dropped, usually because the rider tried to remove all straps before positioning to walk the bike down.
The Release Order
Release rear straps first, then front. This keeps the front of the bike anchored while you position yourself. Only release the final front strap when you are actively holding the bike upright and ready to walk it out of the chock. Release the brake lever tie last, only when the bike is off the chock and you are positioned to control it.
Ramp Considerations for Unloading
Walking a bike down a ramp is slightly harder than up because gravity is now pulling the bike forward while you are trying to control it. Use engine braking (in first gear, engine off, clutch released) rather than the front brake alone, since a lockup on the ramp can drop the bike quickly. A helper walking backward on the ramp with hands ready to steady the bike is worth the extra person.
The Bottom Line
Transporting a motorcycle safely is not complicated, but it is unforgiving of shortcuts. Every step matters: the right chock, four rated ratchet straps, soft loops at anchor points, four-point cross-tension, fork compression to preload the suspension, and a brake lever backup. Do the whole process the right way every time, and motorcycles arrive at their destination in the same condition they left. Skip any step, and the transport becomes a coin flip between a smooth trip and an expensive repair. Twenty minutes of careful loading is trivial compared to the alternative. Our ultimate towing safety guide covers the broader safe-towing habits that complete the picture on any trailer trip.
Ready to move a bike safely? Browse trailers on Neighbors Trailer and filter for motorcycle-specific or enclosed cargo trailers if you are moving a valuable bike or covering any real distance. Confirm the trailer has a wheel chock (or bring your own with proper mounting hardware), verify anchor point locations before loading, and give the tie-down process the full twenty minutes it deserves. The bike you arrive with should be the same one you loaded.