

How to Hook Up a Trailer: A First-Timer's Guide
 Neighbors Trailer
May 26, 2026 235 10 min read
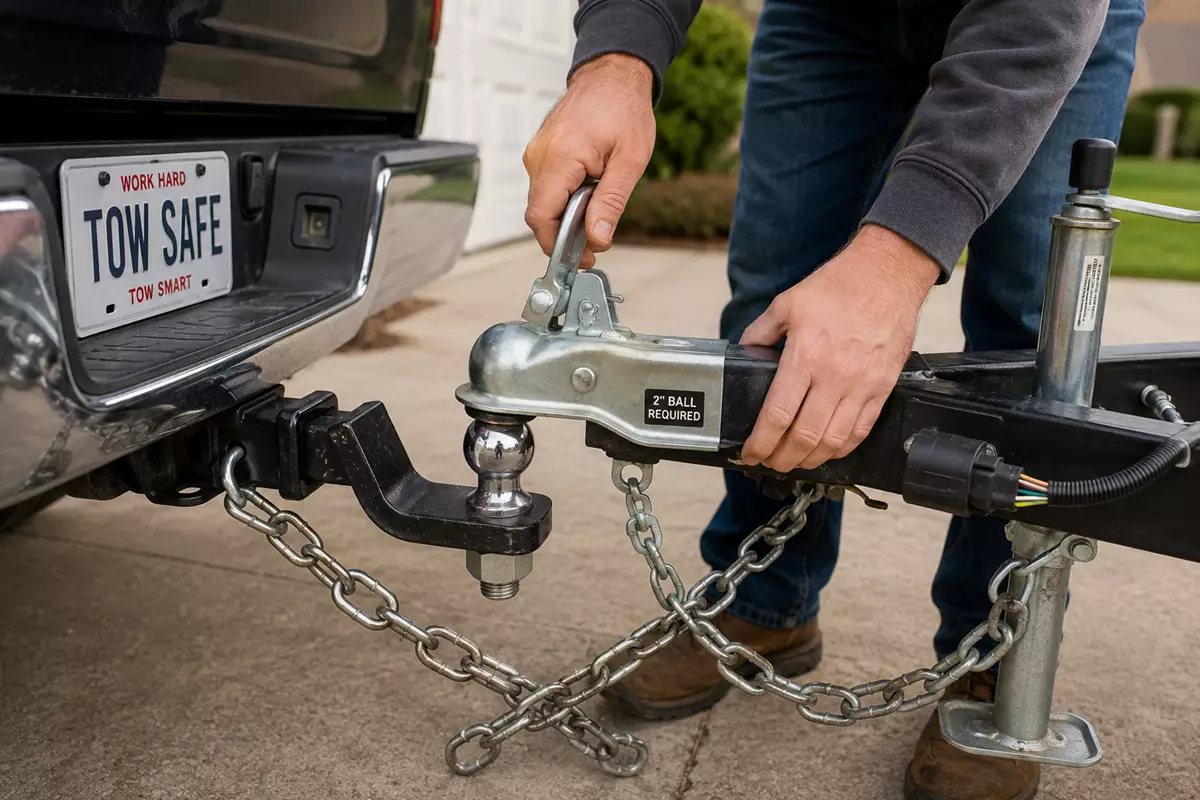
Hooking up a trailer for the first time can feel intimidating. There is the backing up, the heavy coupler, the chains, the wiring, and the quiet worry that you will get a mile down the road and feel the trailer wobble loose behind you. The good news is that hitching a trailer is a simple, repeatable process once you understand the steps and why each one matters. This walkthrough takes you through the entire hookup from start to finish, in plain language, so that by the time you pull away you are confident everything is connected correctly and safely. Whether you just booked your first rental or you are about to tow a borrowed trailer across town, this guide will get you road ready.
Before You Start: What You Need on Hand
Before you back up to anything, take two minutes to confirm you have the right equipment and that it all matches. A successful hookup depends on compatibility between your vehicle and the trailer, and most first-time problems trace back to a mismatch that could have been caught in the driveway.
Here is what to confirm before you begin:
The Right Hitch and Ball Size
Your vehicle needs a hitch receiver with a ball mount, and the ball itself must match the trailer coupler size. The three most common ball sizes are 1-7/8 inch, 2 inch, and 2-5/16 inch. This is the single most important match to get right. A coupler will sometimes sit on a ball that is slightly too small, but it will not lock securely and can come loose on the road. Check the stamped size on top of the ball and the stamped size on the trailer coupler, and make sure they are identical. If you're unsure which hitch class your vehicle and trailer combination requires, our Hitch Class calculator matches GVWR to class in seconds. To figure out the right drop or rise on your ball mount so the trailer sits level, use the Hitch Drop & Rise calculator.
Adequate Towing Capacity
Your vehicle has to be rated to tow the loaded weight of the trailer. If you have not confirmed this yet, do it before you hook up rather than after you load. Our guide on whether your vehicle can safely tow a trailer walks through how to find your numbers, and our breakdown of towing capacity terms like GVWR, GCWR, and payload explains what each rating actually means.
Working Lights and a Wiring Connector That Matches
Trailers use a wiring connector to power the brake lights, turn signals, and running lights. The most common connectors are the 4-pin flat and the 7-pin round. Confirm your vehicle has the same connector as the trailer, or that you have the correct adapter. You will test the lights as part of the hookup, but it helps to know the connector matches before you start.
Step-by-Step: How to Hook Up Your Trailer
With your equipment confirmed, you are ready to connect. Follow these steps in order. Doing them in sequence is what keeps the process safe and prevents the most common mistakes.
Step 1: Position Your Vehicle
Back your vehicle up so the hitch ball sits directly under the trailer coupler. This is the part that takes practice. Go slowly, use your mirrors, and do not be afraid to pull forward and try again. If you have a helper, have them stand to the side, never directly between the vehicle and trailer, and guide you back with hand signals. Getting the ball within a few inches of the coupler is close enough; you can adjust the rest by hand.
Step 2: Raise the Coupler and Lower It Onto the Ball
Use the trailer jack to raise the coupler high enough to clear the ball, then guide the trailer or adjust the vehicle so the coupler is directly above the ball. Open the coupler latch, then lower the jack until the coupler seats fully down over the ball. The coupler should drop into place and surround the ball completely.
Step 3: Latch and Lock the Coupler
Close the coupler latch so it clamps around the ball. Most couplers have a latch lever or handle that flips down, and a hole for a pin or lock. Insert the pin or a coupler lock to keep the latch from popping open while you drive. Give the trailer a firm test: with the coupler latched, raise the jack a little more so the trailer lifts the rear of your vehicle slightly. If the coupler stays seated and lifts the vehicle rather than separating, it is locked correctly.
Step 4: Fully Raise and Stow the Trailer Jack
Once the coupler is locked, raise the trailer jack all the way up. If your trailer has a swing-up or removable jack foot, stow it in the travel position. A jack left partly down can drag on the road or catch on driveway aprons and railroad crossings, so make sure it is fully retracted.
Step 5: Cross and Connect the Safety Chains
Safety chains are your backup if the coupler ever comes loose. Connect them by crossing them in an X pattern underneath the coupler, then attaching each chain to the hitch on the opposite side. The crossed pattern forms a cradle that would catch the trailer tongue and keep it from hitting the ground if the trailer separated. Leave just enough slack for turns, but not so much that the chains drag on the pavement.
Step 6: Connect the Wiring Harness
Plug the trailer wiring connector into your vehicle's matching socket. Route the cable so it has enough slack to turn without pulling free, but not so much that it drags on the ground. If your trailer has a breakaway cable, which activates the trailer brakes if it ever detaches, attach that to a solid part of your hitch, not to the ball or the safety chain loops.
Step 7: Test Every Light
This is the step first-timers skip most often, and it is one of the most important. With the wiring connected, turn on your vehicle and test the trailer's lights. Have a helper stand behind the trailer, or use a reflection in a window or garage door, and confirm the running lights, left and right turn signals, and brake lights all work. If a light does not respond, recheck the connector seating and the adapter before you drive.
Trailer Hookup Pre-Departure Checklist
Before you pull out of the driveway, run through this quick checklist. Each item corresponds to a step above and takes only a few seconds to confirm. Skipping any of them is where most towing mishaps begin.
| Checkpoint | What to Confirm | Why It Matters |
|---|---|---|
| Coupler | Fully seated and latched over the ball, pin or lock in place | Prevents the trailer from separating on the road |
| Ball size | Matches the coupler size exactly | A mismatched ball will not lock securely |
| Safety chains | Crossed in an X and attached to the hitch | Catches the tongue if the coupler fails |
| Wiring | Connected, with slack for turns | Powers brake lights and signals |
| Breakaway cable | Attached to the hitch, not the ball | Activates trailer brakes if it detaches |
| Lights | Running, brake, and both turn signals work | Keeps you legal and visible to other drivers |
| Jack | Fully raised and stowed | Avoids dragging or catching on the road |
| Tires | Properly inflated on both trailer and vehicle | Reduces sway and blowout risk |
How Long Should Hooking Up Take?
If you are wondering whether you are spending too long in the driveway, you are not. First-time hookups take longer, and that is exactly how it should be. Speed comes naturally with repetition, and rushing is where mistakes happen. Here is a rough sense of how hookup time drops as you gain experience.
Typical Trailer Hookup Time by Experience Level
First time 15 to 20 min
After a few hookups 8 to 10 min
Experienced 4 to 5 min
Times include the full safety check. Never skip steps to save minutes; the checklist matters more than the clock.
The goal is never to be the fastest. The goal is to hook up correctly every single time, with the same checklist habits whether it is your first trailer or your fiftieth.
Common First-Time Hookup Mistakes to Avoid
A few mistakes show up again and again with first-time renters. Knowing them in advance is the easiest way to avoid them.
Forgetting to Latch the Coupler
It is surprisingly easy to lower the coupler onto the ball and assume you are connected without actually closing the latch. Always do the jack-lift test in Step 3 to confirm the coupler is locked, not just resting.
Skipping the Light Test
Driving with non-working trailer lights is both dangerous and illegal in every state. The light test takes thirty seconds and prevents a traffic stop or a rear-end collision. Never skip it.
Safety Chains Too Loose or Not Crossed
Chains that drag on the road wear through and fail, and chains that are not crossed cannot cradle the tongue if the trailer drops. Cross them every time and adjust the slack so they clear the pavement through turns.
Ignoring Tongue Weight and Loading
How you load the trailer affects how it tows. Too much weight at the back causes dangerous sway, while a balanced load with slightly more weight toward the front rides steady. Once you are comfortable with hookup, our ultimate towing safety guide covers loading, braking, and highway technique in depth.
Rent With Confidence and Coverage
One of the advantages of renting through a peer-to-peer marketplace is that you are connected to a real owner who knows their trailer. If you are unsure about the coupler size, the wiring connector, or anything else, just ask. Most owners are glad to walk a first-timer through the specifics of their trailer at pickup. It also helps to rent with protection in place. NT Protect adds coverage for just a few dollars per day, giving both renters and owners peace of mind in case something unexpected happens on the road.
If this is your very first rental, our complete beginners guide to renting a trailer covers the booking side of the process, and our road ready safety tips help you prepare for the drive itself.
You Are Ready to Roll
Hooking up a trailer comes down to a handful of clear steps done in the right order: position the vehicle, seat and latch the coupler, raise the jack, cross the safety chains, connect the wiring, and test the lights. Run the pre-departure checklist every time, and the process becomes second nature faster than you would expect. Take your time on the first one, build the habits, and you will tow with confidence on every trip after.
Ready to put it into practice? Find a trailer near you on Neighbors Trailer and book your first rental with confidence. If you own a trailer, listing it is a great way to earn extra income while helping neighbors get their projects done.