Summer Trailer Maintenance for Owners
 Neighbors Trailer
Jun 10, 2026 97 13 min read
If you list your trailer on a peer-to-peer marketplace, summer is the season that pays your invoices for the year. Bookings cluster between Memorial Day and Labor Day, renters tow longer distances in hotter weather, and the equipment works harder than it does any other time of year. The owners who earn the most through that window are not the ones with the newest trailers. They are the ones whose trailers do not break down. Mechanical reliability is the single biggest predictor of whether a host earns five-star reviews, repeat bookings, and the kind of word-of-mouth that fills next summer too. This guide walks through the pre-summer maintenance routine that the best owners use to make sure their trailers spend the busy months earning, not sitting in a shop.
Why Summer Maintenance Matters More for Owners
Trailers fail in summer for predictable reasons. Heat increases tire pressure and stresses sidewalls. Bearings that survived a slow spring get pushed onto highways for the first time since October. Long trips reveal small issues that short ones hide. And every booking is a new renter who may or may not catch a problem before pulling away.
The financial math is straightforward. A trailer that goes out of service in late June for two weeks of repairs misses six or seven peak-season bookings. That is hundreds of dollars in lost revenue plus the cost of the repair itself plus, sometimes, the reputational hit of a refunded booking and a poor review. By contrast, the pre-summer inspection that prevents the breakdown takes about three hours of an owner's time, costs perhaps fifty dollars in parts, and protects every booking through October. It is the highest-leverage time investment in a rental trailer's calendar.
The right way to think about this work is not as a chore but as the closest thing to free money the platform offers. Three hours of preventive maintenance returns more revenue than any other three hours an owner can spend.
The Pre-Summer Owner Checklist
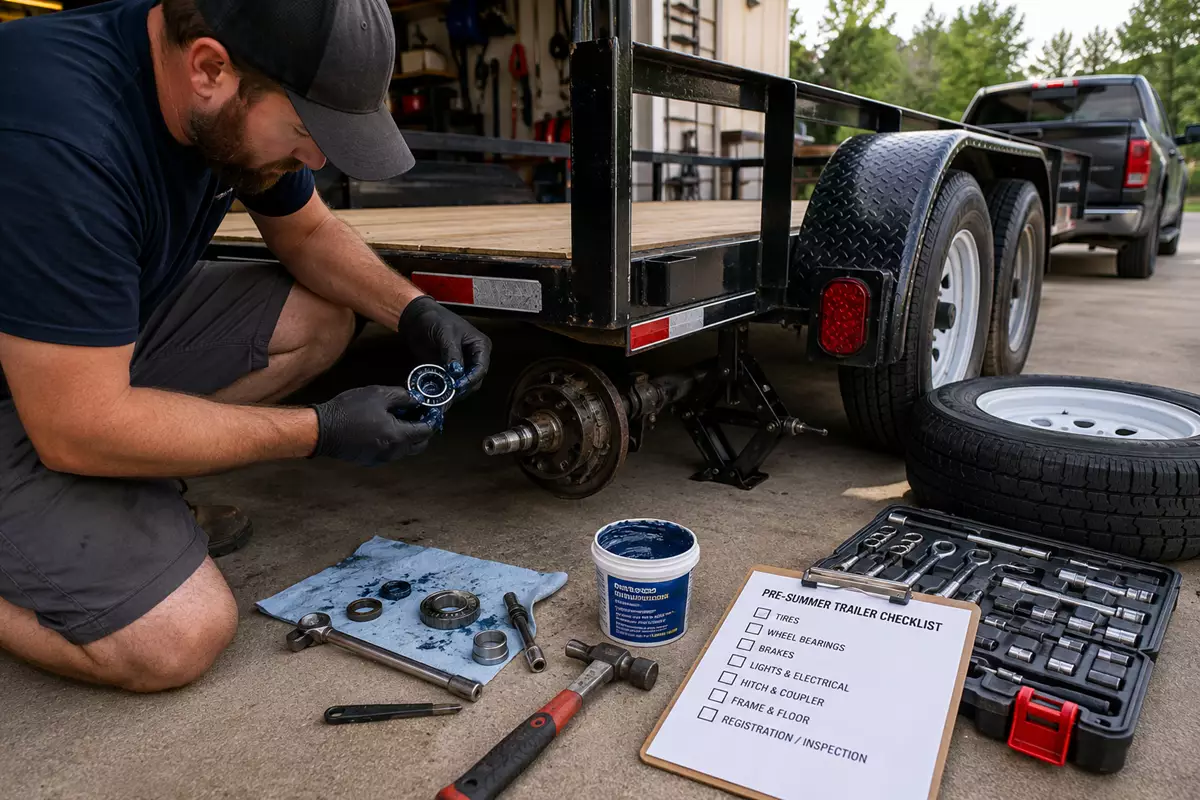
The full pre-summer routine covers seven systems on the trailer. None of them require specialized training to inspect, and most of the actual repairs that come out of an inspection can be done in a driveway with hand tools. The systems are tires, wheel bearings, brakes, lights and electrical, hitch and coupler, frame and floor, and the trailer's own paperwork (registration, inspections where required, and the listing photos). The sections below walk through each in the order that matters most for reliability.
Tires: The Number-One Source of Roadside Failures
Tires account for more roadside breakdowns on trailers than every other component combined. Most of those failures are preventable with a five-minute inspection.
Tread Depth and Sidewall Inspection
Walk around each tire (including the spare) and look for tread wear that is uneven, cupped, or worn to the wear bars. Look for sidewall cracks, especially small spider-web cracks in the rubber surface. Trailer tires often fail from age rather than tread wear, because they sit outside in UV light and dry out. A tire with plenty of tread can still be structurally compromised if the sidewall has begun to crack. If you see crack patterns deeper than a fingernail catch, plan to replace the tire before the season.
Pressure (Cold, Maximum Sidewall)
Trailer tires are inflated differently from vehicle tires. They are typically inflated to the maximum cold pressure printed on the sidewall, which is much higher than what a passenger tire would carry. Check pressure when the tires are cold, before they have been driven on, and inflate to the sidewall maximum. Pressure that looks fine to the eye is often 10 to 20 PSI low. Our trailer tire pressure guide covers the cold-versus-hot distinction and why underinflation is the primary cause of blowouts.
Age: The Detail Most Owners Miss
Every tire has a four-digit DOT date code molded into the sidewall, indicating the week and year of manufacture. The first two digits are the week, the last two are the year. A code reading 2522 means the tire was manufactured in the twenty-fifth week of 2022. Trailer tires should be replaced every three years at a minimum, regardless of tread remaining. UV exposure, heat cycles, and ozone all degrade the rubber compound from the day the tire is manufactured, and the degradation accelerates after the three-year mark even if the tire has spent most of its life parked. If your trailer is on tires older than three years, plan a replacement before peak season. It is the single biggest insurance policy against highway breakdowns.
Wheel Bearings: The Quiet Killer
Wheel bearings are the component most owners forget about, and bearing failures on the road are spectacular. A seized bearing can lock a wheel, damage an axle, and leave the trailer stranded miles from help. The repair is straightforward and inexpensive when done preventively, and brutal when done as an emergency.
When to Repack
Standard guidance is to repack wheel bearings every twelve months or every 12,000 miles, whichever comes first. For a rental trailer that may see heavy mileage in a single season, the annual mark is the safer measure. The job involves jacking the trailer, removing the wheel, pulling the hub, cleaning the bearings, packing them with fresh grease, and reassembling. Most owners can do it in two hours per axle once they have done it once. If your trailer has bearing buddies or oil-bath hubs, the maintenance is different but still annual.
Signs of Bearing Failure
Even between repacks, watch for warning signs: a humming or grinding noise that changes with speed, a wheel that feels warmer than the others after a trip, side-to-side play when the wheel is jacked up and grabbed at twelve and six o'clock, or visible grease leakage past the inner seal. Any of these is a "do not rent this trailer until it is fixed" condition. A renter who experiences a bearing failure has a story that ends badly for you on a review page.
Brakes: Electric, Surge, or Hydraulic
If your trailer is over the threshold for required brakes in your state (typically 3,000 pounds gross), the brake system is one of the safety-critical systems that absolutely must work. Even on smaller trailers where brakes are optional, a working brake system is a major reliability and safety upgrade.
Electric Brake Magnets and Wiring
Electric brakes are the most common system on rental trailers. The two failure points are the magnets (which wear over time) and the wiring (which fatigues at flex points). Before the season, jack each wheel and confirm that applying voltage to the brake circuit produces a strong magnetic pull and that the brakes engage smoothly. Inspect the wiring run from the seven-pin connector back to each brake assembly for fraying, corrosion, or damage. A multi-meter check between the brake pin and the ground pin under load takes thirty seconds and confirms whether the circuit is healthy.
Brake Adjustment
Drum brakes need periodic adjustment to keep the shoes close enough to the drum to engage promptly. Most electric brake systems have a star wheel adjuster accessible through a slot in the backing plate. Adjust until the wheel just barely drags when spun by hand, then back off one or two clicks. A renter using a properly adjusted system feels confident braking; one using a loose system feels nervous, and confidence is reflected in reviews.
If you want renters to leave with a properly tuned brake controller, our guide on setting a brake controller correctly is a useful link to send them at booking confirmation.
Lights and Electrical
Lights are inexpensive, frequently fail, and create immediate problems for renters at handoff. A trailer with a non-functional light is a trailer the renter cannot legally tow at night. Spend the time before the season making sure every circuit works.
The Seven-Pin Connector Test
Plug the trailer into a tow vehicle and have someone work through each function: running lights, left turn, right turn, brake, reverse if equipped, and the auxiliary 12V line. Walk to each lamp on the trailer and verify the correct response. Where a circuit does not work, the failure is almost always at the seven-pin connector itself (corrosion), at a lamp ground (corrosion), or at the lamp socket (corrosion). LED-replacement bulbs and clean ground connections fix ninety percent of issues.
LED Conversion as a Reliability Upgrade
If your trailer still uses incandescent bulbs, converting to sealed LED units is one of the highest-return upgrades you can make. LED units last roughly ten times longer than incandescent, draw less power, and are sealed against moisture, which is the single biggest cause of trailer lamp failure. The full conversion for a small trailer costs around eighty dollars and pays for itself in saved bulb replacements and avoided pre-rental scrambles within the first season.
Hitch, Coupler, and Safety Chains
The connection point between the tow vehicle and the trailer is the safety-critical interface on every rental. Renters trust that this is solid. Verify it is.
Coupler Latch and Hitch Ball Wear
Inspect the coupler latch for smooth operation and confirm it closes fully on a properly sized ball. Look at the inside of the coupler socket for wear marks that suggest a mismatched ball has been used; uneven wear is a sign that the next renter could experience a coupler that does not latch securely. Replace a worn coupler. The part is inexpensive and the safety implications are absolute.
Safety Chain Inspection
Walk the safety chains end to end, looking for stretched or damaged links, hooks with broken springs or worn latches, and corrosion at the attachment points to the trailer frame. Chains are cheap to replace and impossible to compromise on. A renter whose hitch fails and whose chains hold has a story about a near miss. A renter whose chains also fail has a story that involves a police report.
Frame, Floor, and Body
The structural condition of the trailer ultimately determines how long it stays in service. Off-season maintenance is the right time to assess and address issues. Wondering whether that maintenance investment translates into resale value? Our Trailer Value calculator estimates what your trailer is worth today based on type, size, year, and condition.
Rust and Welds
Look at the frame from underneath. Surface rust on a steel frame is normal and can be wire-brushed and painted. Pitting rust, especially around welds, is a structural concern that warrants closer inspection. Walk every weld with your eyes; a cracked weld is a serious safety issue and should be repaired by a certified welder before the trailer goes back out.
Floor Integrity (Especially Wooden Decks)
Wooden trailer decks rot, especially if they get wet, sit in standing water, or were left under tarps that trapped moisture. Walk the entire deck, looking for soft spots, separation between boards, or visible damage. A renter who steps through a rotting deck while loading is a renter who is suddenly negotiating a hospital visit with you. Replace boards before the season starts. Pressure-treated planks last several years and are an inexpensive maintenance line item.
The Maintenance Schedule at a Glance
Here is the rough cadence that keeps a rental trailer in service throughout the year. Most owners build this into a calendar reminder so the pre-summer tasks happen by April or May.
| Component | Inspect | Service | Replace |
|---|---|---|---|
| Tires (pressure) | Every rental, cold | Inflate to sidewall max | At 3 years from DOT date |
| Wheel bearings | Every rental (heat check) | Repack annually | At first sign of play or noise |
| Brakes | Every rental | Adjust as needed, annual full check | Magnets when worn or weak |
| Lights and wiring | Every rental | Clean connectors annually | LED conversion recommended |
| Coupler and chains | Every rental | Lubricate annually | At first sign of wear or damage |
| Frame, welds, floor | Annually | Touch up paint, treat rust | Boards or repairs as needed |
A Pre-Season Time Budget for Owners
Most owners do not realize how little time the full pre-summer routine actually takes. Here is how the hours break down for a typical mid-sized trailer that has been in service for a few years.
Pre-Summer Maintenance Time Budget (Typical Trailer)
Tires (inspect + inflate) 15 min
Wheel bearings (repack) 60 min per axle
Brake check + adjust 30 min
Lights (test + repair) 20 min
Coupler + chains 10 min
Frame + floor walkdown 15 min
Total for a single-axle trailer: roughly 2.5 hours. Tandem-axle adds another hour for the second axle's bearings.
The Pre-Rental Walkthrough
The maintenance routine sets the trailer's baseline condition for the season. The pre-rental walkthrough at each booking confirms that nothing has changed since the previous trip. The best owners use the same five-minute habit at every pickup: walk around the trailer with the renter, point out the current condition, take photos of any existing wear, and confirm that tires, lights, and the coupler latch are all functioning.
Beyond the safety value, this habit dramatically reduces damage disputes. A baseline set at pickup, with shared photos, is the simplest insurance against the "this was already there when I got it" disagreement at return. Renters appreciate the professionalism. Owners protect themselves. It is a quiet five-minute investment that prevents almost every avoidable dispute on the platform.
When to DIY and When to Call a Pro
Most pre-summer maintenance is well within the skill range of any owner who is comfortable with hand tools. Tire pressure, lights, coupler inspection, frame walkdowns, and brake adjustments are routine for a confident DIYer. Wheel bearing repacks are within reach of most owners once they have done it once with a YouTube video as a guide.
The work to delegate to a professional is anything structural (cracked welds, frame repairs, axle issues), brake assembly replacement on hydraulic systems, and any electrical work involving the trailer's main wiring harness if you are not comfortable tracing circuits. The savings on labor for the routine work more than pays for the professional time on the specialized items.
The Bottom Line
The owners who consistently earn the most through summer are not the ones with the fanciest trailers. They are the ones whose trailers never fail mid-rental. Three hours of pre-summer maintenance prevents almost every preventable breakdown for the season, protects every booking through October, and earns the kind of reviews that fill next summer too. The math works out the same way every year. The owners who do the work earn back many times its cost in the bookings they keep.
Ready to make the most of your trailer this summer? If you are already a host on Neighbors Trailer, the pre-summer routine above is the highest-leverage time you will spend on the equipment this year. If you are considering listing for the first time, this is the natural moment to do it. Peak season is here, demand is strong, and a well-maintained trailer earns its keep faster than most owners expect.