How to Set Your Trailer Brake Controller Correctly
 Neighbors Trailer
Jun 2, 2026 503 11 min read
If your tow vehicle is equipped with a trailer brake controller, you have one of the most important pieces of towing safety equipment available. You also have a setting that, if you get it wrong, can damage the trailer's tires, increase your stopping distance, and make towing more dangerous than necessary. The setting most renters underestimate is the gain, and the moment most renters overlook is the return trip with an empty trailer. This guide walks through what your brake controller actually does, how to set it correctly the first time, and how to avoid the single most common mistake that turns a perfectly good rental into a damaged tire and an awkward conversation.
Why Brake Controller Settings Matter More Than Renters Realize
The trailer brake controller is the device in your tow vehicle that tells the trailer's electric brakes how hard to apply when you press the vehicle's brake pedal. When it is set correctly, the trailer and the tow vehicle slow down together as one balanced system. When it is set too low, the tow vehicle does almost all of the braking, stopping distances grow, and the trailer can push the vehicle forward in a panic stop. When it is set too high, the trailer's brakes apply harder than the vehicle's, the trailer wheels lock and skid, and you can flat-spot a tire in a single firm stop. Both directions are unsafe in different ways, but the too-high setting is the one that causes the most damage to rented equipment.
For first-time trailer renters, this is one of the parts of towing that is easy to overlook because the vehicle does not warn you when the controller is wrong. There is no dashboard light. There is no error code. The only feedback you get is how the rig feels under braking, and by the time the feel tells you something is off, you may already have created flat spots on the trailer's tires.
What Your Brake Controller Actually Does
A brake controller has one main job: send the right amount of electric current to the trailer's brakes at the right moment. Two settings determine how it does that.
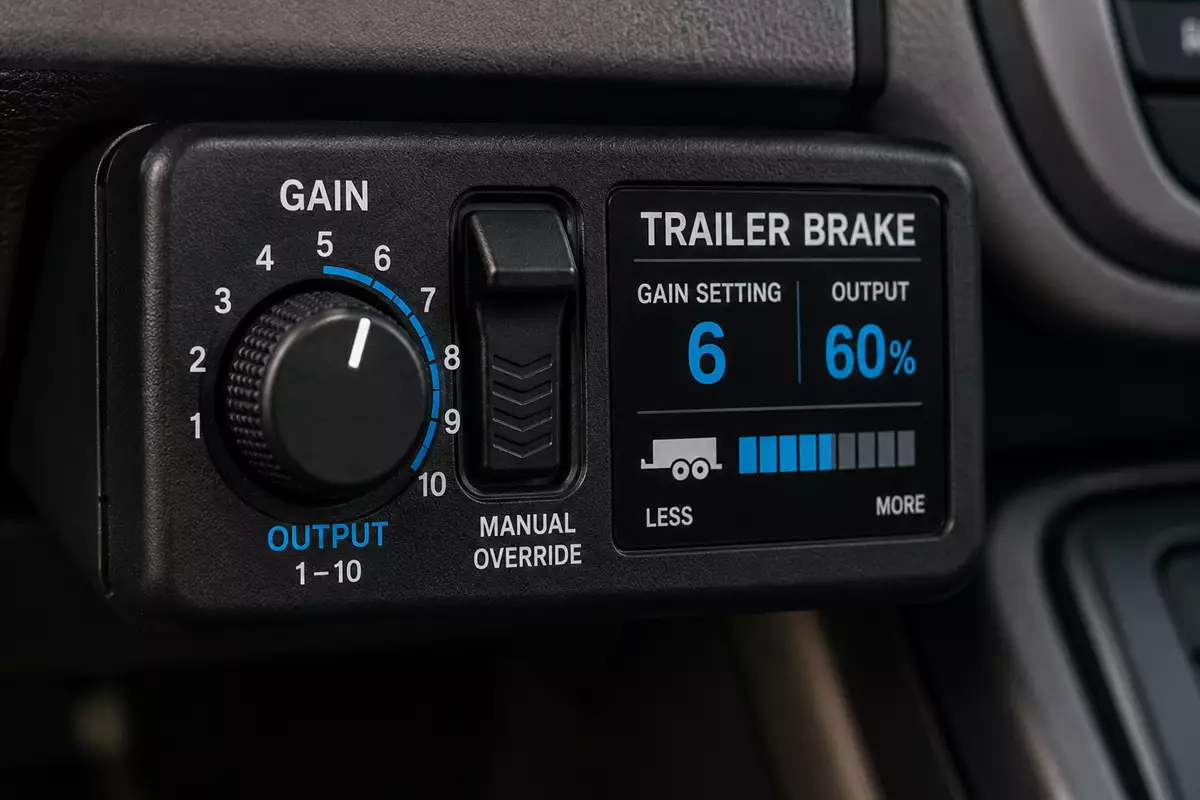
The first is gain, sometimes labeled output or power. Gain controls how much braking force the trailer applies for a given amount of vehicle braking. A higher gain means more trailer brake for the same pedal pressure. The second is sensitivity, which on proportional controllers determines how quickly the trailer brakes ramp up in response to the vehicle's deceleration. Most renters only need to think about gain. Sensitivity is usually fine at the factory default.
Controllers come in two general types. Proportional controllers use motion sensors to apply trailer brakes in proportion to how hard the vehicle is decelerating. They feel natural and are widely considered the better option. Time-delayed controllers apply a preset amount of braking force whenever the brake pedal is pressed, regardless of how hard the vehicle is stopping. Time-delayed controllers are simpler and less expensive but can feel grabby. Most modern factory-integrated controllers in trucks and SUVs are proportional.
Finding the Gain Setting in Your Vehicle
The location of the gain control depends on whether your controller is built into the vehicle or aftermarket.
Factory-Integrated Controllers
If your truck or SUV came with a trailer brake controller from the manufacturer, the gain setting is almost always accessible from the dashboard or touchscreen. On Ford F-series trucks, look for a Trailer Brake setting in the gauge cluster menu or the SYNC display. On RAM and Chevrolet trucks, look in the trailering or towing menu on the infotainment screen. The setting is usually expressed as a number from 1 to 10 or a percentage from 0 to 100.
Aftermarket Controllers
An aftermarket controller is the small box typically mounted under the dash near the driver's right knee. Look for a knob or dial labeled gain or power, and a manual override lever or button. The gain knob is what you adjust when you change loads. The override is what you press to test the trailer brakes alone, which is part of the parking-lot setup procedure described below.
If you are renting a trailer and are not sure whether your vehicle has a brake controller at all, our post on whether you need a brake controller to tow a trailer walks through how to tell and when one is required.
How to Set the Gain Correctly: The Parking Lot Test
The right gain setting depends on the loaded weight of the trailer, the type of brakes the trailer has, and the tow vehicle. Manufacturer-recommended starting numbers get you in the right neighborhood. The parking lot test gets you to the correct setting for your specific combination.
Here is the procedure. Find an empty parking lot or quiet stretch of road. Hitch up, load the trailer, and confirm everyone is safely belted in. Start with the gain set to a low number, around 4 or 5 on a 1 to 10 scale. Accelerate to roughly 25 miles per hour. Press the manual override or activate the trailer brakes alone, without using the vehicle's brake pedal. Pay attention to what happens.
If the trailer barely slows the vehicle, the gain is too low. Turn it up two clicks and try again. If the trailer wheels lock up and you hear a screech or feel a skid, the gain is too high. Turn it down two clicks and try again. The correct setting is the highest gain at which the trailer brakes firmly without locking the wheels. Most loaded combinations land in the 6 to 8 range, but your number depends on your specific setup, and you should always confirm with the test rather than just dialing in a default.
Recommended Starting Points by Trailer Type
Use this table as a starting point only. Always perform the parking lot test to dial in the exact setting for your specific rig and load.
| Trailer Type and Load | Approximate Loaded Weight | Starting Gain (1-10 scale) |
|---|---|---|
| Small utility trailer, lightly loaded | Under 2,000 lbs | 3 to 4 |
| Utility trailer, loaded with mulch or gear | 2,000 to 3,500 lbs | 4 to 5 |
| Enclosed cargo trailer, loaded | 3,500 to 5,500 lbs | 5 to 6 |
| Dump trailer, loaded | 5,000 to 8,000 lbs | 6 to 7 |
| Car hauler with vehicle loaded | 6,000 to 9,000 lbs | 6 to 8 |
| Large flatbed or equipment trailer, loaded | 8,000 lbs and up | 7 to 9 |
| Any trailer, empty | Empty | 2 to 3 |
Notice that last row. The setting for an empty trailer is dramatically lower than the setting for the same trailer loaded, and that gap is the source of the most common brake controller mistake renters make.
The Empty-Trailer Mistake That Damages Tires
Here is the scenario that quietly produces more rental tire damage than almost any other towing mistake. You set the gain on Saturday morning for a fully-loaded trailer. The parking lot test goes well, the trip goes well, you arrive at your destination, and you unload. The trailer is now empty. You hop back in the vehicle, head home, and at the first firm stop on the way back, the empty trailer's wheels lock up. You may hear a squeal. You may feel the trailer jerk. Then it is over and you keep driving.
What just happened is that the brake force you set for a 5,000-pound loaded trailer is now hitting a 1,500-pound empty trailer. The brakes that were appropriately firm with the load are now wildly overpowered without it. The wheels lock, the tires skid, and a chunk of rubber gets ground off the contact patch in a single spot. That is a flat spot, and once a tire has one, it cannot be fixed. The tire will produce a thump-thump vibration at speed for the rest of its life, and on a rental trailer it is a damage claim.
The fix is simple and takes ten seconds. Before you start the return trip with an empty trailer, turn the gain down to roughly 2 or 3 on the 1 to 10 scale. The trailer will still help slow the vehicle, but the brakes will no longer be overpowered for the load. When you arrive home and unhitch, set the gain back to a neutral starting point so you do not forget for next time. This single habit prevents the most expensive brake controller mistake renters make.
Signs Your Brake Setting Is Wrong
The feel of your rig under braking is the most reliable feedback on your gain setting. Here is how the three states compare.
Brake Controller Gain: How Each Setting Feels and What It Does
Too low Trailer pushes vehicle in stops, long distances, possible loss of control
Correct Smooth, balanced deceleration, no skid, no push
Too high Trailer wheels lock, tires skid, flat-spotting damage on firm stops
If you cannot tell, default toward slightly lower and adjust upward. A slightly low setting is safer for the equipment than a slightly high one.
The middle state is the goal. If you feel the trailer pushing the vehicle in stops, raise the gain. If you hear a squeal or feel a skid, lower the gain. Most loaded combinations need only small adjustments after the initial parking-lot setup.
Pre-Departure Brake Check Habit
Before every trip, take ten seconds at the start of your drive to verify the brake controller is doing its job. Get the rig rolling at 10 to 15 miles per hour in a safe area, then activate the manual override on the controller. You should feel the trailer's brakes engage and slow the vehicle slightly. If you feel nothing, something is wrong before you ever leave the driveway, and it is much better to discover that on a quiet residential street than at highway speed. This habit takes less time to perform than reading this paragraph, and it has prevented more towing incidents than almost any other pre-trip check. Our broader pre-trip walkthrough is covered in our road ready safety tips guide, which is worth a quick scan before your next rental.
Common Mistakes Renters Make With Brake Controllers
A few patterns produce most of the brake controller problems on the road. Knowing them in advance is the easiest way to avoid them.
Setting It Once and Forgetting It
The single most common mistake, and the one that produces the empty-trailer scenario described above, is setting the gain once at the start of a trip and never touching it again. The right gain changes as the load changes. Build the habit of adjusting it before each significant change in trailer weight.
Cranking It Up at the First Hint of Trouble
If the trailer feels like it is pushing during a stop, the instinct is to dial the gain all the way up to fix it. That works briefly, then introduces lockup the next time you brake firmly. Two clicks at a time, with a parking lot test in between, is the right pace of adjustment.
Ignoring It Because It Is Working
If the rig feels fine, it is tempting to leave the gain wherever it is from the last trip. The problem is that the last trip's setting was for the last trip's load. Always confirm the setting matches the current load before you head out, even if the controller has not been touched since.
Renting Without Asking About Controller Compatibility
If you are renting a trailer with electric brakes, your tow vehicle needs either a factory-integrated or aftermarket brake controller to operate them. Confirm this before you book. Most owners are happy to confirm the trailer's brake type, and our ultimate towing safety guide covers the full pre-rental compatibility check.
You Are Set Up to Stop Safely
Brake controller settings sound technical, but the practical version is short. Set the gain with a parking lot test before the first loaded trip. Turn it down before the return trip with an empty trailer. Do a ten-second manual-override check before each drive. Those three habits prevent almost every brake-related problem renters run into, and they protect both your safety and the trailer you are renting. Once they are habits, you will not think about them, and you will tow with confidence on every trip.
Ready to put it into practice on a rental? Browse trailers on Neighbors Trailer and ask the owner about the trailer's brake type before you book so you know exactly what to expect on pickup day. If you own a trailer with electric brakes and are thinking about listing, sharing your recommended gain settings with renters is one of the most appreciated things a host can do.