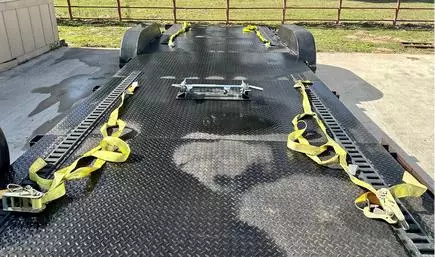
A Simple & Easy Guide to Installing E-Tracks on a Car Trailer
 Neighbors Trailer
Jan 13, 2024 2408 7 min read car trail
If you have ever watched a strap slip mid-trip or a quad shift on a tight turn, you already know that secure tie-downs are not optional. Installing E-tracks on a car trailer is the single best upgrade most owners can make for safer hauling, faster loading, and a more flexible deck layout. This guide walks through every step of a clean E-track install, the tools and hardware to choose, the load math behind the system, and the mistakes that send people back to the hardware store on a Saturday afternoon.
Why E-Tracks Belong on a Car Trailer
E-track is a slotted steel rail bolted to the trailer's floor or wall. Each slot accepts a fitting (O-ring, D-ring, wood beam socket, or strap end) that locks in with a quarter turn. Compared with random welded D-rings or stake pockets, E-track gives you adjustable anchor points every six inches, so you can secure a sedan, a side-by-side, and a stack of toolboxes on the same deck without crossing straps or chasing geometry. If you're still choosing a car hauler to fit your vehicle, the Car Hauler Calculator sizes the deck you need.
The system also spreads load across the rail rather than concentrating it at a single weld point. That matters when a 4,000 lb vehicle is bouncing through highway expansion joints. A properly installed rail rated for a 5,000 lb working load gives a serious margin of safety for anything a typical open or enclosed car trailer can legally haul.
Tools and Materials You'll Need
Tools
Plan on a half-day with a corded drill, a metal-cutting drill bit set (1/8 inch pilot and 3/8 inch final), a tape measure, a square, a marker, a deburring tool, a torque wrench, and a socket set. A friend on the other end of the rail makes alignment much easier.
Materials
For a standard 16 foot open car trailer, two 8 foot horizontal rails along the deck edges and two 5 foot vertical rails on the wheel-well sides cover the most common load patterns. Buy galvanized rail rather than painted steel for any open trailer, since road salt eats unprotected E-track in a single winter. Use grade 5 or grade 8 carriage bolts sized to your deck thickness, locking flange nuts, and large fender washers under the deck.
Step-by-Step Installation
Step 1: Plan the Layout
Lay every rail out on the deck before you mark a single hole. You want continuous coverage where you'll attach wheel straps and ratchet straps, but you also want the rails clear of door swings, ramp hinges, and tongue toolboxes. For most cars, anchor points six to eight inches behind and ahead of each wheel give the best four-point tie-down geometry.
Step 2: Mark and Measure
With the rails clamped in place, mark every bolt hole with a center punch. Most rails have pre-drilled mounting holes every twelve inches; use them rather than improvising. Double-check that your marks land on solid frame crossmembers or a doubled-up deck section, not the open span between supports.
Step 3: Drill Pilot Holes
Drill a 1/8 inch pilot through each marked spot first, then step up to your final 3/8 inch bit. Deburr both sides of every hole so the bolt seats flat and water has no jagged lip to pool against. A drop of zinc-rich primer in each hole adds years of corrosion protection on an open trailer.
Step 4: Bolt the Rails Down
Drop carriage bolts through the rail and deck from above, then add a large fender washer and a locking flange nut underneath. Snug every bolt by hand first, then torque to spec in a star pattern so the rail seats evenly. Over-tightening will dimple the rail and weaken the slot geometry around the bolt.
Step 5: Test Fit and Load Check
Drop a fitting into every slot to confirm it seats and releases cleanly. Hook two straps to opposing rails, tension them moderately, and check the underside for any deflection or paint cracking around the washers. If everything stays flat under tension, you're ready to load real cargo.
E-Track Component Load Limits
Working load limits vary by component, and the weakest link in your tie-down system, not the rail, is what governs your real-world capacity. The chart below shows typical published working load limits for the major E-track parts you'll use on a car trailer.
NeighborsTrailer.com
Hardware Spec Reference
Use the quick reference table below to match your hardware to deck thickness and rail position. These numbers reflect typical recommendations for steel-framed open and enclosed car trailers; always defer to your rail manufacturer's documentation when it disagrees.
| Deck Thickness | Bolt Size | Bolt Grade | Bolt Length | Recommended Rail |
| 1.5 inch wood | 3/8 inch | Grade 5 | 2.5 inch | Horizontal floor rail |
| 2 inch wood | 3/8 inch | Grade 5 | 3 inch | Horizontal floor rail |
| 1/8 inch steel | 5/16 inch | Grade 8 | 1.5 inch | Vertical wall rail |
| 3/16 inch steel | 3/8 inch | Grade 8 | 1.75 inch | Horizontal or vertical |
Common Mistakes to Avoid
The most expensive mistake people make is bolting rail into thin deck sheet with no backing plate. Fender washers help, but on lightweight enclosed trailers a 1/8 inch backing strap under the rail line distributes load far better. The second most common mistake is mounting rails too close to the wheel wells; if a fitting lands above the tire it becomes useless during a real tie-down, since you cannot route a strap straight to the car. Finally, never use deck screws as a substitute for through-bolts. A 5,000 lb working load needs a fastener that goes all the way through the deck and clamps from both sides. For a deeper look at common strap and anchor pitfalls, see our companion car trailer tiedown guide.
Maintenance and Safety
Once a season, walk every rail with a putty knife and a wire brush. Pop debris out of the slots, check each bolt for tightness, and look for any surface rust at the mounting hardware. Replace any fitting that does not lock with a clean quarter-turn click. If you find a bent slot, mark it with paint and stop using that anchor point until the rail is repaired or replaced. Anchor failure under load is one of the leading causes of cargo loss on highway trailers.
Frequently Asked Questions
Can I install E-track on an aluminum car trailer?
Yes, but use stainless or zinc-coated hardware to avoid galvanic corrosion against the aluminum, and always run a backing plate under thin aluminum deck sections.
How many feet of E-track does a 20 foot car trailer need?
Most owners run two 16 foot rails along the deck edges and two 5 foot rails on the wheel-well sides, for roughly 42 linear feet of rail. That gives full four-corner tie-down flexibility for anything from a smart car to a full size truck.
Will adding E-track void my trailer warranty?
Drilling the deck or frame can affect some warranties, especially on new aluminum-framed trailers. Check your trailer's documentation and consider bolting rails to existing factory-drilled crossmembers when possible.
What's the difference between horizontal and vertical E-track?
Horizontal rail is designed to mount flat to a floor or wall with the slot facing up. Vertical rail mounts the same way physically but is engineered to handle straps pulling perpendicular to the rail, which is what happens on a wall mount during transit. Use the rail type the manufacturer specifies for your mounting orientation.
Final Thoughts
A clean E-track install pays for itself the first time you secure a vehicle in under five minutes with no creative knotwork. Plan the layout carefully, use through-bolts and backing washers, and respect the working load limits printed on every fitting. Done right, your car trailer becomes a dramatically more capable platform for vehicles, equipment, and gear. If you're comparing E-track to other tie-down options, our cambuckle ratchet strap guide covers the strap side of the equation in detail.
Related Articles
- Cambuckle Ratchet Straps for Car Trailer Tie Downs
- E-Track Guide for Cargo Trailers
- Car Trailer Rental Tiedown Guide
- Complete Tiedown Guide for Enclosed Trailers
Content updated May 2026