

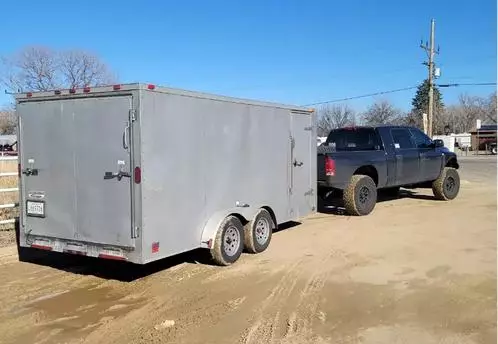
How to Restore an Enclosed Trailer Rental To Maximize Value
 Neighbors Trailer
Aug 28, 2023 1066 8 min read trailer restoratio
An enclosed trailer is one of the best long-term investments a small business or weekend hauler can make, but only if it is kept in working order. A trailer that sits outside through five winters will show it in rusted frame rails, delaminated plywood, flickering tail lights, and a roof that leaks at the first heavy rain. The good news is that almost every enclosed trailer, no matter how neglected, can be brought back to rental-ready shape with a weekend of effort and a few hundred dollars in materials. This guide walks through a complete restoration process from initial inspection to the final detail pass.
Why Restore Instead of Replace?
New enclosed trailers in the 6x12 to 8.5x20 range have climbed steadily in price over the last five years. Tariffs on steel, a nationwide shortage of trailer-grade plywood, and a surge in rental demand have all pushed sticker prices higher. Restoring a 10 to 15 year-old enclosed trailer typically runs 10 to 20 percent of the cost of a comparable new unit, and a properly refurbished trailer can easily earn back its restoration cost in a single busy rental season on a peer-to-peer platform.
The other benefit is structural. Older enclosed trailers were often built with heavier-gauge steel and thicker wall panels than today's budget-tier models. If the frame is still square and the axles are serviceable, a restored vintage trailer can outlast a new economy trailer by years.
Tools and Materials You Will Need
Before starting, gather the supplies listed in the table below. Splitting the project across a Saturday and Sunday is realistic for most trailers. Dedicated body-shop professionals can move faster, but weekend mechanics should budget 16 to 20 hours of total work.
| Restoration Phase | Key Tools | Key Materials | Typical Time |
| Inspection | Flashlight, torque wrench, multimeter | Notepad, tire pressure gauge | 1 hour |
| Prep and cleaning | Pressure washer, shop vacuum | Degreaser, drop cloths, painters tape | 2 hours |
| Rust removal | Angle grinder, wire wheel, sander | Rust converter, steel wool, acid-based rust remover | 3 to 5 hours |
| Paint and coating | Spray gun or rattle cans, respirator | Self-etching primer, enamel topcoat | 4 to 6 hours |
| Interior refit | Drill, impact driver, utility knife | New plywood, wall liner, LED lights, D-rings | 4 to 6 hours |
| Final detail | Polishing wheel, torque wrench | Wax, new decals, replacement locks | 1 to 2 hours |
Step 1: Full Inspection
Start with the frame. Crawl underneath with a flashlight and look at every cross member, the tongue, the coupler, and the axle mounts. Surface rust is normal on any trailer over three years old, but flaking scale or pitted steel at weld joints is a warning sign. Tap suspect areas with a small hammer. A crisp metallic ring means the steel is sound. A dull thud means the rust has eaten deep into the cross section.
Move on to the floor. Push down hard on every square foot. Soft spots signal delaminated plywood and usually a roof leak directly overhead. Inspect the roof seams and every fastener penetration for failed sealant. Open the rear door and check the hinges, latch, and seal. Finally, check the wiring. A quick test with a multimeter at the plug end confirms whether the running lights, brake lights, and turn signals are all still functional.
Step 2: Deep Clean and Prep
A pressure washer makes the next stages much easier. Wash the exterior, the interior walls, the floor, and the underside. Let the trailer dry fully before starting any rust removal. Wet steel flash-rusts within hours, which ruins the prep work. While the trailer dries, mask off the tail lights, tires, reflectors, and any decals you want to preserve.
Step 3: Rust Removal
Three methods cover almost every rust situation on an enclosed trailer. The method you choose depends on severity and location.
Wire Wheel and Angle Grinder
A knotted-wire wheel on a 4.5 inch angle grinder strips heavy surface rust from frame rails, cross members, and large panels faster than any other tool. Wear a full-face shield and long sleeves. Wire wheels shed bristles that can embed in skin.
Steel Wool and Hand Sanding
For lighter rust on curved surfaces, decorative trim, or around hinges and latches, medium-grade steel wool and a handheld sanding block give more control without removing good paint. This is also the right choice around wiring, where a grinder could cause damage.
Chemical Rust Converters
For rust that has pitted the metal but not eaten through, a phosphoric-acid based rust converter chemically transforms red iron oxide into a stable black coating that can be painted over directly. Apply with a brush, let it dwell per the product instructions, and rinse if required. This is the easiest method for hard-to-reach cavity spaces inside the frame.
Step 4: Prime, Paint, and Seal
Once all rust is addressed, wipe every bare metal surface with a solvent-based prep cleaner to remove grinding dust and finger oils. Apply a self-etching primer first. Self-etching primer chemically bonds to bare metal and creates a corrosion-resistant base that ordinary enamel primers cannot match.
For the topcoat, rust-preventive enamel in a rattle can is fine for weekend projects. Two to three light coats produce a more durable finish than one heavy coat. If the trailer will live outside year-round, add a clear UV topcoat to protect against sun fade. Once the paint is cured, walk the roof seams and reseal every joint with self-leveling lap sealant. Skip the cheap silicone tubes from the big box store; they fail within a year and trap moisture underneath.
Step 5: Interior and Electrical Refit
Pull any rotted plywood floor panels and replace them with 3/4 inch exterior-grade plywood sealed with oil-based porch and floor paint on both sides. Plywood sealed on only one face cups and warps the first time it sees moisture. Repair or replace interior wall liner, replace any cracked LED lamps with sealed LED units, and test every circuit end to end with the tow vehicle connected.
Add or refresh tie-down points. D-rings that are recessed into the floor or bolted to the wall studs protect cargo and renters alike. A trailer that comes with eight to twelve solid attachment points is instantly more rentable than one with two rusty hooks.
Cost Breakdown of a Typical Restoration
Restoration budgets vary with trailer size and the severity of the damage. The chart below shows a representative cost breakdown for a 7x14 enclosed trailer brought from rough shape back to rental ready.
NeighborsTrailer.com
Turning a Restored Trailer into Income
A clean, structurally sound enclosed trailer listed on a peer-to-peer marketplace pays back its restoration cost quickly. Enclosed units command the highest rental rates in the trailer world because renters use them for moving, job-site tool storage, race car hauling, and mobile events. If you are planning to list a refurbished trailer, the owner earnings guide walks through pricing strategy, photo tips, and insurance considerations.
Maintenance After Restoration
A full restoration resets the clock, but ongoing maintenance keeps the trailer in that state. Wash it after every muddy trip, inspect the roof seams twice a year, repack the wheel bearings at the manufacturer-recommended interval, and check tire pressure before every tow. For deeper guidance on keeping trailer tires healthy long-term, see the trailer tire care guide.
Frequently Asked Questions
Is it worth restoring a rusted trailer or should I scrap it?
If the frame rails and cross members are still straight and the rust has not eaten through the steel at any stress point, restoration is almost always cheaper than buying new. Structural rust through the frame itself is the only case where scrapping makes more sense.
How long does a proper enclosed trailer restoration take?
A typical 7x14 enclosed trailer restoration takes one full weekend, around 16 to 20 hours of labor. Extensive frame repairs or a full interior rebuild can extend that to 30 hours or more.
Can I repaint an aluminum-skinned enclosed trailer?
Yes, but the prep is different. Aluminum requires a self-etching primer formulated for non-ferrous metals and a more thorough degreasing step before primer goes on. Skipping these steps causes peeling within a few months.
What is the single biggest mistake people make restoring trailers?
Ignoring the roof. A good paint job and new floor mean nothing if the roof still leaks at the front cap. Strip the old sealant, clean the seams down to bare metal, and apply fresh self-leveling lap sealant before anything else.
Do restored trailers qualify for peer-to-peer rental?
Yes. Most marketplaces accept trailers that pass a visual and mechanical safety check, regardless of age. A well-documented restoration can actually make listings more attractive to renters who want to know the trailer has been recently serviced.
Final Thoughts
Restoring an enclosed trailer is one of the most rewarding DIY projects an owner can take on. The payoff is a safer, better-looking trailer that can serve you personally or earn rental income for years. Stick to the inspection checklist, do the rust and paint work carefully, and do not skip the roof and wiring. The trailer you finish this weekend can still be working for you a decade from now.
Related Articles
- Will an Aluminum Trailer Develop Rust?
- Essential Guide on Trailer Deck Surfacing
- How to Make Money With a Trailer and Be Your Own Boss
- A Complete Guide to Tiedowns for Enclosed Trailer Cargo
Content updated April 2026