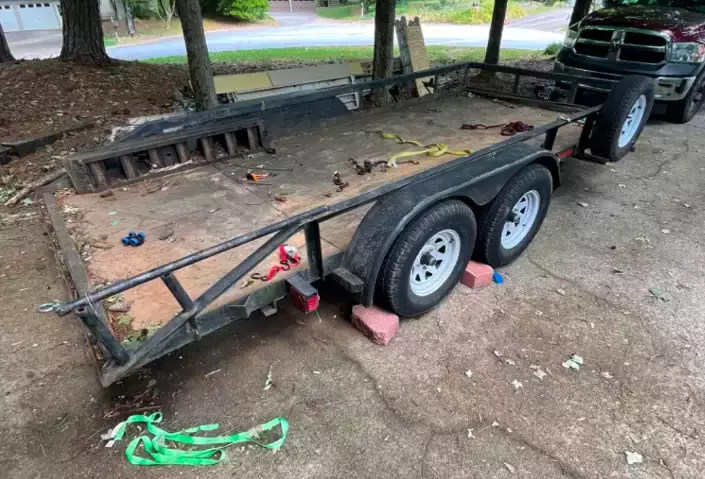
How to Fix Your Old Trailer to Make it Brand-New
 Neighbors Trailer
Mar 17, 2023 1101 8 min read trailer restoration
Restoring an old trailer is one of the most rewarding projects a trailer owner can take on. Whether you inherited a rusted utility trailer, picked up a beat-up flatbed for next to nothing, or want to extend the life of your current rig, fixing up an old trailer can save you thousands of dollars compared to buying new. This complete guide walks you through the entire restoration process, from initial inspection to getting back on the road.
At Neighbors Trailer, we help trailer owners and renters get the most value from their equipment. If you have an old trailer sitting in your yard, it is probably worth more than you think. With the right approach, you can restore it to reliable, road-ready condition and even list it for rent to earn passive income while it sits idle.
Is Your Old Trailer Worth Fixing?
Before investing time and money into a restoration, you need to ask one honest question: is this trailer worth saving? Not every old trailer is a good candidate for a DIY restoration project. Start with a thorough inspection of the frame.
Surface rust, peeling paint, and worn wood floors are all fixable problems. However, if the steel frame shows deep pitting, cracks, or structural failure from corrosion, repair costs may exceed the trailer value. Inspect the welds, the tongue, cross members, and the coupler for signs of serious damage. If the structure is sound underneath the rust and grime, you have a solid restoration candidate worth moving forward with.
Common Trailer Restoration Tasks and Typical Costs
Understanding cost before you start helps you budget and decide whether DIY or professional work makes more sense for each task:
| Repair Task | Typical Time | DIY Cost Estimate | Pro Cost Estimate |
| Rust removal and surface prep | 2 to 4 hours | $20 to $50 | $100 to $200 |
| Frame repainting | 3 to 6 hours | $50 to $150 | $200 to $400 |
| Wood floor replacement | 4 to 8 hours | $100 to $300 | $300 to $600 |
| Brake adjustment or replacement | 1 to 2 hours | $30 to $80 | $80 to $150 |
| Lights and wiring replacement | 2 to 4 hours | $30 to $80 | $100 to $200 |
Step 1: Gather Your Tools and Supplies
A successful trailer restoration starts with having the right tools on hand. You will need an angle grinder with wire wheel attachment for rust removal, sandpaper in grits from 80 through 220, a rust converter or inhibiting primer, spray paint or brush-on frame coating, and basic hand tools for disassembly and reassembly. If you are replacing floor boards, add a circular saw, drill, treated lumber or composite decking, and deck screws to your list.
Step 2: Disassemble and Document
Before you start grinding, photograph your trailer from every angle. Document how wiring runs, how hardware connects, and where each component attaches. This reference will save hours of frustration when reassembling. Remove the lights, detachable fenders, removable floorboards, and accessories. Label wire connections and bag hardware by component so nothing gets mixed up or lost.
Step 3: Remove All Rust From the Frame
Rust removal is the most labor-intensive part of any trailer restoration. Work through three stages for best results and a surface that primer can bond to properly.
Wire Brush and Angle Grinder
Start with a wire wheel attachment on an angle grinder to knock off heavy rust scale. Work in sections and wear eye protection and a dust mask throughout this stage. For tight corners where a grinder cannot reach, a hand wire brush does the job effectively.
Sandpaper and Steel Wool
After removing heavy rust, sand the surface smooth with 80-grit sandpaper, then follow with 150-grit. Steel wool works well on curved sections like pipes and tongue tubes. The goal is clean, bare metal that primer can bond to without contamination.
Chemical Rust Converter for Stubborn Spots
Some pitting and recessed rust will not fully sand away. For those areas, apply a chemical rust converter, which bonds chemically with remaining rust and converts it into a stable compound that can be painted over. Let it cure fully per the product label before moving to primer.
Step 4: Prime and Repaint the Frame
Once the surface is clean, coat the entire frame with a rust-inhibiting primer. Allow it to cure completely before applying the topcoat. For the topcoat, use a trailer-specific frame paint or high-quality rust-resistant enamel. Two light coats produce better adhesion and durability than one heavy coat. Allow 24 to 48 hours of curing time before reassembly to prevent paint damage.
Step 5: Replace Worn or Damaged Components
With the frame clean and painted, work through your parts list and replace everything worn, cracked, or corroded. Common replacements include the coupler, safety chains, wiring harness, wheel bearings, brakes, and wood or composite flooring. Pay close attention to axle alignment after any structural work, as even minor misalignment leads to uneven tire wear and poor tracking. Read more in The Importance of Trailer Axle Alignment. Also inspect and test your brakes thoroughly after restoration. Learn what to look for in Everything You Need to Know About Trailer Brake Systems.
Step 6: Reassemble and Test
Reassemble the trailer using your documentation and photos as a guide. Torque all hardware to manufacturer specifications, re-run wiring with weatherproof connectors, and replace any fasteners showing significant corrosion. Before loading the trailer, test running lights, brake lights, and turn signals. Pull it by hand to check wheel tracking, and verify brakes engage and release correctly. A short unloaded test drive before the first loaded haul is always worth the time.
Restoration vs. Buying New: A Cost Comparison
NeighborsTrailer.com
Turn Your Restored Trailer Into Passive Income
Once your trailer is road-ready, you have a real asset on your hands. Listing it on Neighbors Trailer is one of the smartest ways to earn a return on your restoration investment. Trailer rentals in many markets earn between $80 and $200 per day depending on trailer type and size. By listing your restored trailer, you earn income on every day you are not using it yourself.
Every rental booked through Neighbors Trailer automatically includes NT Protect, a coverage plan charged to the renter at booking for just a few dollars per day. This means your trailer is covered on every rental without any extra steps or decisions on your part. If you are thinking about buying a used trailer instead of restoring one, check out our Used Trailer Buying Guide for what to look for before you commit to a purchase.
Frequently Asked Questions
How long does it take to fully restore an old trailer?
A basic restoration covering rust removal, repainting, and minor parts replacement typically takes one weekend. A full restoration with floor replacement and wiring can take two to three weekends depending on the extent of the damage and your skill level.
What is the most important step in trailer restoration?
Rust removal and proper surface preparation is the single most critical step. If you rush through this stage, primer and paint will not adhere well and rust will return quickly. Spending extra time on surface prep pays dividends for years afterward.
Is restoring a trailer worth it versus buying used?
In most cases, restoring a trailer you already own or picked up cheaply is significantly more cost-effective than buying a comparable used unit in good condition. A trailer with a solid frame but surface rust can typically be restored for $350 to $850 total, versus $2,000 or more for a comparable used trailer. The key is verifying the frame is structurally sound before committing to the project.
What paint works best for a trailer frame?
Look for a rust-inhibiting oil-based enamel formulated for metal. Products designed for farm equipment or trailer chassis work well. Flat black is the most common finish for trailer frames and handles heat from brakes better than gloss finishes. Always apply over a rust-inhibiting primer for maximum adhesion and protection.
Can I restore a trailer with deep structural rust?
If rust has eaten completely through structural frame members, professional welding repairs are necessary before the trailer is safe to use. Surface rust is entirely manageable, but if you can push a screwdriver into a frame rail with moderate pressure, that section needs to be cut out and replaced by a qualified welder. Never put a load on a structurally compromised frame.
Related Articles
- The Used Trailer Buying Guide: What to Look for Before You Buy
- Why Trailer Axle Alignment Matters After Any Restoration
- Everything You Need to Know About Trailer Brake Systems
- How to Choose a Trailer Hitch Weight Distribution System
Content updated March 2026